

26 Mar 5 Ways To Optimise Images For Better Web Performance
5 Ways To Optimise Images For Better Web Performance
Search engine optimisation is an integral part of making your website perform well and function properly.
But what doesn’t get enough attention is the specific optimisation you need for each of your website’s elements.
For instance, images need particular optimisation as opposed to what you do for your videos.
Luckily, it’s easy to get started, so here are the five ways to optimise images for better web performance.
What Is Image Optimisation?
To put it simply, image optimisation is about customising your images in the same way you would prepare your website for search engines (i.e. search engine optimisation).
When you optimise images, it can influence – directly and indirectly – such metrics as SEO ranking, page loading speed, conversion rate, and user experience.
Image optimisation usually includes several techniques you can use on your images to improve them and prepare them for search engines.
These techniques include anything from resizing and image compression to lazy loading and disabling hotlinking.
1 – Run an Image Optimisation Audit
Before you optimise images, the first thing you should do is run an image optimisation audit.
An image optimisation audit is a way for you to understand better which issues you can expect to encounter – but it will also help you see the strengths of your current image library.
An image optimisation audit will show you precisely what you should improve about your images and what you should focus on while doing so.
To get started with the image optimisation audit, carry out an inventory of the images currently on your website.
By running the proper tests, you will detect any issues with the images that you will then start working on when you start using the different image optimisation techniques listed in this article.
Remember not to hurry when you are conducting the image optimisation audit because you might miss some crucial issues.
One of the issues the image optimisation audit can detect is that you have too many images on your website.
Though this might not seem like an issue at first, it can prevent your website from loading quickly.
Another issue you may encounter is that your images aren’t formatted correctly, which means that you could significantly improve your website’s overall performance once you work on their formats.
What you should pay particular attention to is the way your images are named.
It would help if you were especially careful with your file names because they can significantly impact your search engine optimisation.
In other words, if your images aren’t named correctly, your website could end up ranking much lower in search engine results which will lead it to be discovered less than you would like it to.
Instead of using your files with the names they got when you took the photo, created the illustration, etc., you need to rename them appropriately using the relevant keywords you come up with.
You don’t need to make them very long as long as they correspond to what the images contain and have the necessary keywords to help SEO sense.
2 – Start with the Image Basics
Once you have completed the image optimisation audit, you will first need to start with the image basics before getting to more complicated image optimisation techniques.
Starting with the basics will allow you to work with your images’ essential aspects to ensure that everything is perfect, even at the lowest levels.
After all, you don’t want to suddenly find out that there is an issue with something you can no longer change.
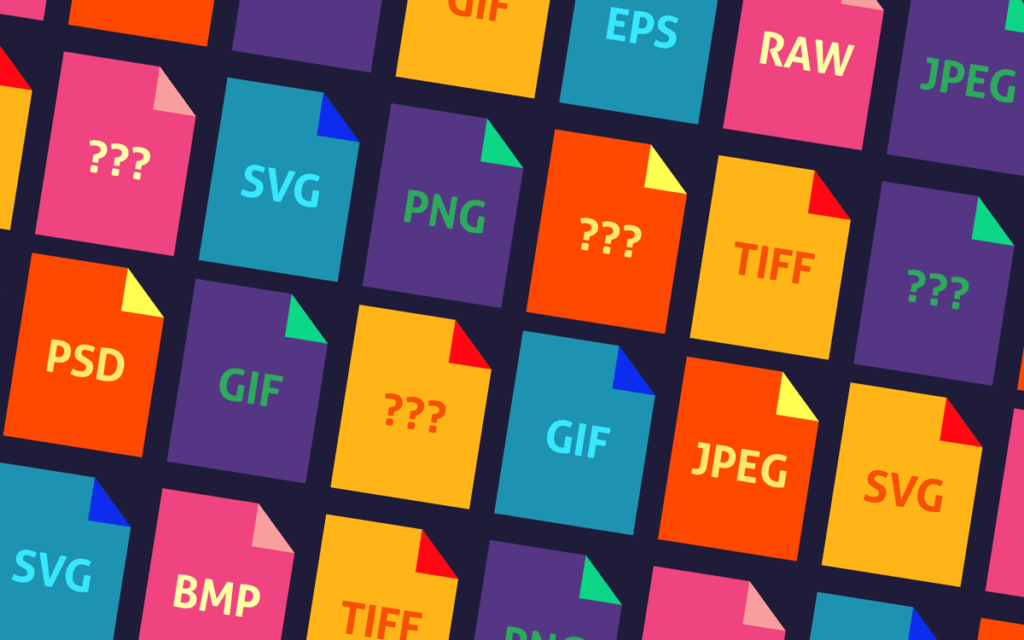
First, you need to think about the format of your images. The most common image formats include JPEG, PNG, GIF, TIFF, and WEBP.
JPEG is widespread thanks to its relatively small file size, but it can lose quality when compressed.
PNG is also common and usually has very high quality, but it weighs a lot.
GIF is perfect for animations or low-res moving images.
TIFF is mainly used for large-high-quality images, while WEBP has high quality and can be compressed next to no loss.
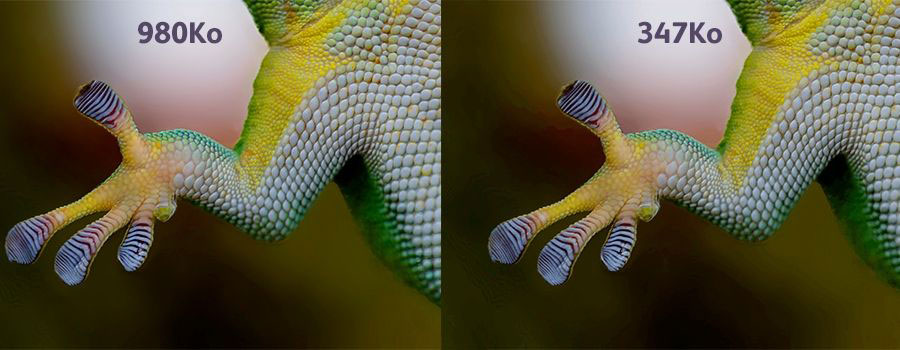
Speaking of compression, using it can help you reduce your images’ size and make them load faster while also increasing your site pages’ loading speed.
While testing the images, you may notice that some time passes before the entire image loads – this means it’s too heavy, and you need to use compression to reduce its weight.
Most of the time, you will want to have your images in the 1 to 2 MB range even after compression.
There are several ways you can reduce your image size:
- Cropping: Use a cropping tool to cut off some parts of the images. This can be used when your images have elements that you don’t necessarily need. It also lets you keep the quality of your images as intact as possible.
- Compression: Another way to reduce image size is by running the images through a compression process. In some cases, compression can reduce your image quality, while there won’t be much of a difference in others. Lossless compression (which works for JPEG, PNG, and GIF) retains your image quality, while lossy compression (which works for JPEG) reduces image quality though this may not be visible sometimes.
3 – Think About Mobile First
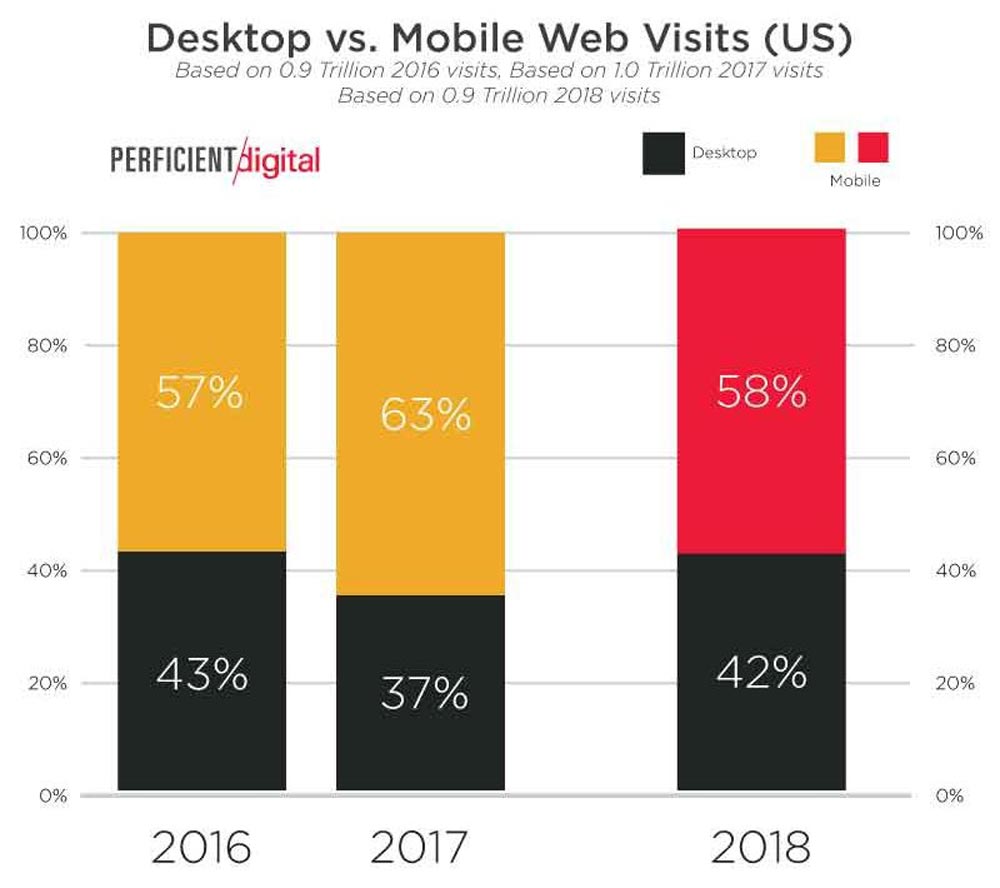
As you optimise your images, one of the most important things you need to remember is mobile-friendliness.
Perhaps the best thing you can do is think about mobile-first because if your website looks terrible on mobile devices, it will underperform significantly, with users leaving almost immediately.
That’s why you need to think about some of the essential things that make up your website and make it perform well on all devices.
As Jennifer Cobblestone from the writing service site Trust My Paper says,
“Imagine that someone Googles something and gets on your website. But once they get on your site – and are using their smartphone to access it – they realise that your site’s interface looks off. It appears to be a desktop version reduced in size. And once they see this, they will quickly decide to leave because using the desktop version on a small screen is incredibly uncomfortable. That’s exactly why you need to make a mobile version of your website.”
It would help if you thought about making your UX better, which you can do by optimising images to appear the same on any device.
They need to be high-quality whether they appear on your site’s desktop version or one of its mobile versions.
It’s a matter of aesthetics, but it’s also a matter of functionality.
In other words, if your images aren’t optimised for mobile, your audience will have a significantly worse user experience.
To have images appear ideally on every device, you will need to make them responsive.
When designing your site’s mobile version, make your images responsive by taking their regular versions and cropping or scaling them down to create their mobile versions.
Such responsive images will increase the site loading speed, increase your mobile traffic, increase the average session time, increase conversion and sales rates, and so on.
To put it simply, it’s vital to use responsive images on your site.
4 – Optimise Images for Tricky Situations
After setting up the basics and thought about mobile-friendliness, you should also optimise your images for tricky situations.
To do this, you will need to use several techniques because one tactic can’t deal with every single tricky situation your site can get in.
Here are some tips to get you started with such image optimisation:
- Browser Caching: When you set-up browser caching, your site tells your site visitors’ browsers to store specific files in their local systems instead of downloading these files every time the user visits your website. Because caching is used, your images will now load much faster every time these users return to your website (or even as they browse it). You can also set up browser caching to store images for a certain amount of time instead of storing them forever.
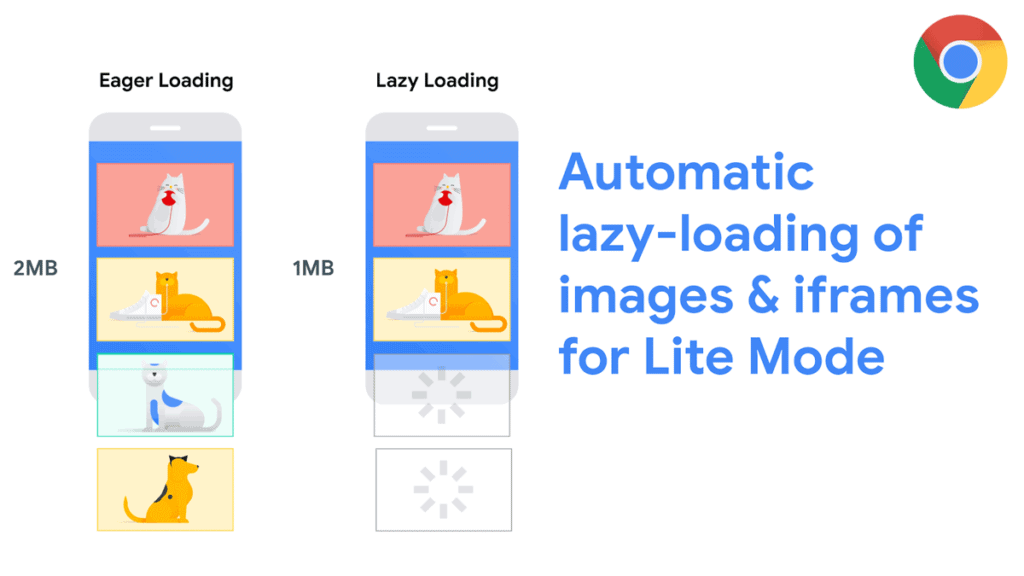
- Lazy Loading: Lazy loading is another way to handle image loading speeds. To put it simply, lazy loading makes images on your website load gradually instead of loading altogether. In practice, this looks like an image unfolding instead of instantly appearing on the page. This is great because it shows the user only the part of the image they need to see at that moment (i.e. to the moment in the page they scrolled to). This way, it’s easier for images to load even with a poor connection.
- Flaky Connections Optimisation: Speaking of poor connection, it is indispensable to optimise your images for flaky connections or these users will leave your website in disappointment. You can use special plugins that compress your images in real-time after detecting which connection type these users are using (such as 4G, 3G, 2G, or slow 2G). Once the plugin detects the connection, it compresses images to accommodate for this connection and load properly.
- Disabling Hotlinking: Another thing you will want to do is disable hotlinking. Hotlinking happens when a different person copies the URL of your image and embeds it on their website, making the image appear on their site as if it is their owned content. By disabling hotlinking, you prevent such situations from happening (even if the person copying your image infringes on your copyright unintentionally).
5 – Use Tools to Optimise Images
Finally, as you work with image optimisation, you need to remember to use tools for it.
Of course, you can apply many of the techniques listed in this article without using any additional resources, but it’s worth simplifying the tasks for yourself to have a more pleasant experience with image optimisation.
And besides, you can’t do some things without the help of specific tools. Here are just some image optimisation tools to check out:
- Adobe Photoshop: It is probably the most well-known software for editing images; Adobe Photoshop is the perfect choice for editing your images before you upload them. You can crop out the unnecessary parts, but you can also add effects and maintain the same aesthetic throughout your entire website, essential for branding.
- Optimizilla: Considered one of the best compression tools out there, Optimizilla is great for JPEG and PNG formats. The best part about this tool is that it can retain outstanding quality even while reducing the image size significantly. This is especially important because many compressed images end up losing their quality.
- Compressor.io: If you find Optimizilla to be too complex or you don’t like its interface, or you want to try something different, then it’s worth checking out Compressor.io, which is also known for retaining high levels of quality while compressing images to a much smaller size (up to 90% smaller). Compressor.io works for such image formats as JPEG, PNG, GIF, and SVG.
- Kraken.io: Yet another image compression tool, Kraken.io, is one of the best of its kind and allows you to convert images in bulk, perfect for a faster compression process. You also can choose between lossy and lossless compression, which allows you to control the compression process even more.
- Optimole: If you want to work with a CDN for a change, consider using Optimole. This plugin can compress and resize your images while also helping you with lazy loading by hosting your images on their CDN. In other words, it’s a multifunctioning plugin that provides you with a variety of features to optimise images.
Final Thoughts
To sum up, optimising your images is an excellent practice to take up as you optimise your website for search engines.
Take the techniques listed in this article and integrate them into your strategy.