12 May Top 7 Tips for a More Productive Photoshop Workflow
Top 7 Tips for a More Productive Photoshop Workflow
There are a lot of apps and tools to help you edit images, retouch, add effects, or create image compositions. While one app can usually fulfil up to three functions, Adobe Photoshop can manage all of these tasks.
Therefore, it is not a big surprise that it is the most famously used software by designers and creatives.
Photoshop is being used by a wide range of professionals: photographers, graphic artists, designers and web-developers.
They claim that photoshop helped them to discover a brand-new world. You do not have to wait for perfect lightning to get a high-quality picture, you can put into life the grand ideas you do not have enough money for, you can turn something average into a masterpiece.
However, learning how to use photoshop is not an easy task. It may take quite a while before you learn the basics.
Then, when you think that there is nothing you do not know about Adobe Photoshop, they release a new version with numerous updates and new features.
New versions are a great relief for those who feel the program lacks some tools but is the biggest evil for those who are in the phase of trying to put the finger on what is going on in this big new world.
After you have learned the tools, you start to realise that creating a masterpiece takes more time than you thought (or wanted) to. It may take you hours to edit or create a single picture. So it is easy to get unmotivated and stressed by slow progress.
Moreover, the world is overly demanding right now. The topics of efficiency, multitasking, and constant productivity are not trendy anymore.
They have become a part of our everyday life. Our weekends should be productive even. That being said, many employers are looking for professionals who can make products of high quality as fast as possible.
Sadly, if you are not efficient enough, you can get easily swamped by the labour market that gets more competitive every day.
If you want to be up to or exceed the expectations of your boss, if you’re going to make your experience of using the photoshop not as time-consuming as it is now, if you want to have more masterpieces and spend less time on the process of creation, this article is for you.
We are here to help you with seven tips for a more productive photoshop workflow!
Learn and Use Keyboard Shortcuts
Click to Show full Photoshop Shortcut Cheat Sheet
Source: Creative Bloq
This tip is often overlooked not only by beginners but by professionals as well.
When we have just started to learn Photoshop, there are so many instructions, step by step guides, and tips that we get easily overwhelmed with all the information.
There are just so many things to know! Consequently, we do not want to put even more pressure on our brains, and it is very reasonable. As they say, learn to walk before you run. So we do not determine the keyboard shortcuts straight away.
Yet, if you are reading this article, it is just the perfect time to improve your Photoshop workflow!
Shortcuts are not only a way to show your proficiency in the language of technology, but they also have an impressive variety of benefits.
First of all, it makes you more efficient, of course! You do not have to reach for the mouth every time you have to do something.
It is especially vital for those who love to work from bed and barely can use a standard mouse, so they use the ones on their laptops (which consumes much time in the long run). Keyboard shortcuts are a great help there!
Secondly, it makes you… healthier? People who work a lot with computers have RSI (Repetitive Syndrome Injury). We repeat the same movement while using our mouse more than we should.
When you use shortcuts in your Photoshop workflow, you do not scroll or raise your fingers to tap the mouse all the time, which sufficiently decreases the risk of injury.
There are the main keyboard shortcuts you may want to use while using Photoshop workflows. You can always customise your shortcuts as well.
Learning shortcuts may seem like an activity that requires time. Yet, know that it is obvious how using keyboard shortcuts helps your performance and health, putting some effort into it seems reasonable. These efforts will do you much good in the long run.
Set Your Photoshop Preferences
Photoshop preferences, such as general display options, performance options, cursor options, file-saving options, etc. is yet another tool to make your Photoshop workflow more productive.
One of the first preferences is export clipboard. It can drastically influence the performance of the computer you use. Copies of images and layers are being saved to Adobe Photoshop clipboard that takes space in your computer memory but has its own section.
Usually, this clipboard is enabled. This means that all these copies go straight to the memory of your operating system. Since files from Photoshop are enormous, the overall performance of your computer decreases, and it may also lead to significant errors. These problems can be avoided by setting Photoshop preferences.
In Photoshop preferences you can also change the interface (colours, highlight colour, font size, etc.), file handling preferences (autosave, list of recent files), performance preferences (memory usage, history states), and many others.
These preferences will not only save your computer from overworking and you from being less productive than you want but influence the quality of your work as well.
It may seem like a very dull task, though but it will be worth it if you use Photoshop regularly.
To set the preference to fit your perfect workflow, you need to choose Edit, then Preferences, and tick the choice you want to change in the submenu if you are the user of the Windows operating system.
For Mac users, only one step is different: Edit will change into Photoshop. Restart the program after that to make sure all the changes are saved and working.
Use Workspaces
Workspaces allow you to readjust to fulfil different types of tasks.
In the beginning, we mentioned that photoshop fulfils many different tasks. However, these tasks use various tools. What can be used for editing, turns out to be useless in typography.
The panel of tools that Photoshop offers is too big to fit in on your screen. You can get lost among them while looking for a specific tool for the task you are working on.
Therefore, it is essential to choose only the ones that are valid for the situation. You will not spend time on the search, and you can concentrate your full attention on the image itself.
Photoshop itself provides three workspaces: Painting, Typography, and Photography.
These are not specific, right? So analyse the type of tasks that you usually get and the tools that you use for them, and create several workspaces.
It will require less time than designing a new workspace every time you get a new task.
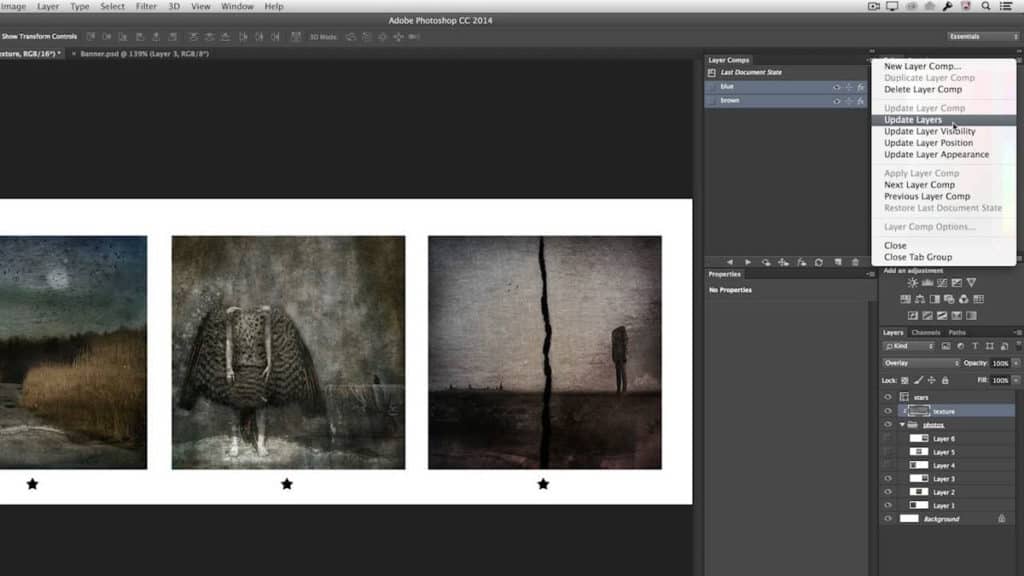
Use Layer Comps
Layer Comps is a panel that allows you to store layer compositions saving the current state of layers and recall them any time you need.
You can show and hide the combination of layers without a need to group them first.
Layer Comps is a perfect tool for those who manage alternative layout, who need multiple versions of their file or different states are required for this one particular task.
If you are choosing between two colour themes, you can save both previews and export them with just one click.
To use the feature, work with your document until you are satisfied with it, set the visibility and position of the layers.
Go to Windows – Layer Comps and create a new Layer Comp. Give it a proper name (not just 12klr2, naming everything right saves you much time!) and select the options for your layers. Press Save.
After that, you can make more changes to your document and create a new Layer Comp. Switching between these Comps takes seconds.
Adjustment Layers and Smart Object are Your Friends

It happens a lot that we get an idea in our head – the beautiful vision of our perfect file.
We start working on that but, as it often turns out, the idea looked better in our head than it does in real life.
We want to go back to the original, but something goes wrong. Changes can be irreversible if no proper tools are used.
Adjustment Layers and Smart Object allow you to make mistakes (which are a part of learning and a human thing to make) that can be, however, undone.
Adjustment Layer is a specific type of layer that does not possess its own content but adjusts the information of the layers that follow it.
You do not apply any changes to the original image. It means that you can see how the idea that you suddenly got will look like after it gets a form without being afraid that it will turn out badly.
You can find the Adjustment Layer icon in your panel.
Smart objects contain the data from the source image, preserve it, and give you a representation of the image that you can work with.
It helps you to perform a nondestructive way of editing, one of the essential concepts in the life of a Photoshop user.
To create a smart object, Choose File – Open As Smart Object, select a file, and click Open.
Do Not Repeat the Same Action Over and Over again

Sometimes you have many images that should be edited in the same way. So do you have to open every image in Photoshop and set for this routine?
It does not just sound boring; it takes a lot of your precious time. Photoshop team sees the problem here so they created a bunch of tools that will help you:
- the Batch command
It works like that: you choose a file, click Automate, go for Batch (Photoshop). Then select the actions you need to make from the pop-up menus. When you see a Source pop-up menu choose the folder, import (images from a camera, PDF document or scanner), opened files, or Bridge. That is it – you saved lots of time and do something more excited.
It is not well-known among Photoshop users. Yet.
To create a Droplet, open Photoshop, File – Automate – Create Droplet… Then choose where you want to see your Droplet icon, choose actions you want to apply.
You may also want to choose the place where the edited by your Droplet files will go and what names they will get. Press okay.
After you have to choose the files you want to change and put them over the Droplet. It is as easy as that!
Use a Drawing Tablet


- Stunning 23.6 inches touchscreen display with 4K resolution so you can see every detail of your creation in pinpoint accuracy
- True to life color with 99 percentage Adobe RGB and 97 percentage sRGB color performance and 1.07 billion colors (10 bits color)
- Includes a Wacom Pro Pen 2 with tilt recognition and 8,192 levels of pressure sensitivity. Optical bonding eliminates parallax, mimicking the precision and feel of pen and paper
- Multi touch gestures, an on screen keypad, radial menus and the included ExpressKey Remote for one touch shortcuts
- Connect Cintiq Pro 24 to your Mac (OS X 10.11 or later) or PC (Windows 7 or later) with the included cables for USB C, HDMI or Mini/DisplayPort
There is a discussion if you need a drawing tablet to work in Photoshop. It is usually questioned by people who use Photoshop for quite a long time and know that it is okay without a tablet too. However, okay is not about productive and effective, right?
The graphic tablet allows you to be faster, more accurate and has a variety of settings built into it.
That being said, many people claim that stylus is much more accurate than a mouse. It is in the form of a pen, not just because.
While using Photoshop, you have to make small movements that are more difficult to control with a mouse.
It feels more natural to use a pen in that case. A stylus has much more built-in settings that allow you to take more control over the result of your hard work.
For instance, only the pressure feature is worth all the mouses and keyboards in the world.
So using the perks of accuracy and built-in settings, you do not have to fix this or that regularly which saves much time and makes your work better actually. Thus, investing in a good tablet is a wise decision, after all.
These were seven tips for a more productive Photoshop workflow. All of them need some effort (or money investment) at first but are a life-saver for everyone who works closely with Photoshop.
Author Bio: Brenner Thomas is a blogger who enjoys writing articles about home decoration and house security. After working as a writer for various media publications, Brenner decided to start his own blog top10pack.com where he covers topics of lifestyle, house decoration and home security.
Last update on 2020-05-13 / Affiliate links / Images from Amazon Product Advertising API